Let's see what WireGuard, the fastest and newest VPN protocol, can offer us.

Wikipedia defines WireGuard as:
A communication protocol and free and open-source software that implements encrypted virtual private networks, and was designed with the goals of ease of use, high speed performance, and low attack surface.
But what does it actually mean?
PPTP (Point-to-Point Tunnelling Protocol) is one of the oldest VPN protocols in existence, developed in the mid-1990s by some Microsoft engineers. Built into Windows 95, this PPTP was specifically designed for dial-up connections. But with time, the encryption of PPTP was quickly obsolete, compromising its security.
That's just to say VPN are old.
Although IKEv2 is not as popular as other protocols, it is present in many mobile VPNs. It offers one key advantage: being able to reconnect during a loss of connection, as well as during a change of network.
OpenVPN, is a protocol which has quickly become one of the most widely used protocols. Apart from being open source, OpenVPN is also one of the most secure protocols. In addition to providing strong encryption, OpenVPN is also available on a majority of platforms: Windows, macOS, Linux, Android, iOS, routers, and more.
Now that we know a bit more about other VPN techs, why should care about WireGuard ?
Most VPN solutions in existence today were designed a long time ago. They are therefore particularly slow and sophisticated. This is where WireGuard comes in.
WireGuard prioritizes security and simplicity. It started in 2017 when Jason Donenfeld, a security researcher, needed a stealth traffic tunnelling solution that could be used during penetration testing missions.
WireGuard uses a selection of modern, thoroughly tested and peer-reviewed encryption algorithms. Specifically, WireGuard uses ChaCha20 for symmetric encryption, with Poly1305 for message authentication. This combination is intended to be more efficient than AES on processor architectures that do not have cryptographic hardware acceleration. It also includes built-in protection against key spoofing, denial of service, and replay attacks.
The protocol is also discreet, since it does not respond to packets from peers that it does not recognize. Therefore, a network scan will not reveal that WireGuard is running on a machine. Also, the connection between peers, goes silent when there is no data exchange.
On Linux, WireGuard works exclusively within the kernel. Because of this, its performance is much better than that of OpenVPN.
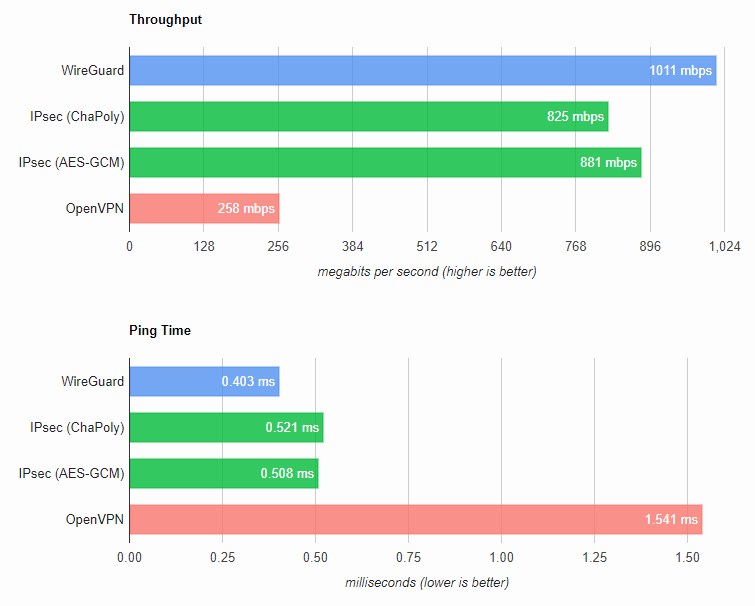
At equal hardware, it achieves almost quadruple the speed than that of OpenVPN while still keeping the CPU free for other task
However, WireGuard implementations for Android, iOS, macOS, OpenBSD, and Windows are written in the Go programming language while their functionally remains identical, non-Linux WireGuard implementations work in user space. They also don't enjoy the same performance as the kernel implementation. That said, they still manage to match or exceed OpenVPN in a majority of cases.
WireGuard is so light compared to other heavy protocols that it has successfully been implemented on IoT devices such as the ESP32:
Creating a WireGuard tunnel is extremely easy, but first there are some terms that need to be clarified for ease of understanding. Each WireGuard configuration contains
[Interface] is the configuration of the actual system interface, it contains a public / private keypair, the address of the client and sometimes the DNS[Peer] can be seen as a link to another machine, it can be one of two things:For this example, I'll make a tunnel between two VPS that I rent.
The first thing I did is to generate keypairs for the server and the client:
1root@vps-main:~# wg genkey | tee /dev/stderr | wg pubkey
2cCwKXFdKHSWl13MrmCa14xgi0nVKOM9C84iu7c4V9Xo=
3gjElwjk3JrkD/ygAdU9kDorNlAB0ipzMLerqzoyPeGw=
1root@vps-f2ab7591:~# wg genkey | tee /dev/stderr | wg pubkey
2AGfj1lm/qshnn5BNJ3e7psD6YRoGXdPF/DEvvNbDuHg=
37vWlRieSG02iZ60XU8fRsr/jaLKFZdlX1APA0lpBWTA=
Now that that is done, I created the server on vps-a, to do that, I edited the file /etc/wireguard/wg0.conf and wrote this:
[Interface]
Address = 192.168.99.1/24
ListenPort = 56789
PrivateKey = cCwKXFdKHSWl13MrmCa14xgi0nVKOM9C84iu7c4V9Xo=

[Peer]
PublicKey = 7vWlRieSG02iZ60XU8fRsr/jaLKFZdlX1APA0lpBWTA=
AllowedIPs = 192.168.99.2/32
Let's explain each line:
[Interface] Indicate the start of an interface definitionAddress Set the IP address of the server in the VPN, in this case 192.168.99.1. It also sets the range to /24ListenPort Set the server port to 56789PrivateKey Sets the VPN private key[Peer] As this is a server, peer in this context means clientPublicKey Sets the public key of that clientAllowedIPs Sets the IP addresses that the client is allowed to use, in this case only 192.168.99.2After that, it's just a matter of enabling the interface and starting the service with the help of wg-quick:
root@vps-main:~# systemctl enable wg-quick@wg0.service
root@vps-main:~# systemctl restart wg-quick@wg0.service
Then we can run the wg command to see if everything was successfully setup:
root@vps-main:~# wg show wg0
interface: wg0
  public key: gjElwjk3JrkD/ygAdU9kDorNlAB0ipzMLerqzoyPeGw=
  private key: (hidden)
  listening port: 56789

peer: 7vWlRieSG02iZ60XU8fRsr/jaLKFZdlX1APA0lpBWTA=
  allowed ips: 192.168.99.2/32
Now that we have a server we need a client, thankfully it's pretty much the same thing. Here is the config:
[Interface]
Address = 192.168.99.2/24
ListenPort = 56789
PrivateKey = AGfj1lm/qshnn5BNJ3e7psD6YRoGXdPF/DEvvNbDuHg=

[Peer]
PublicKey = gjElwjk3JrkD/ygAdU9kDorNlAB0ipzMLerqzoyPeGw=
AllowedIPs = 192.168.99.0/24
Endpoint = my-server.tld:56789
Let's explain each line:
[Interface] Indicate the start of an interface definitionAddress Set the IP address of the client in the VPN, in this case 192.168.99.2. It also sets the range to /24ListenPort Set the server port to 56789PrivateKey Sets the client private key[Peer] As this is a client, peer in this context means the serverPublicKey Sets the public key of the serverAllowedIPs Sets the IP addresses that the client is allowed to use, in this case the whole 192.168.99.0 subnet can be accessed. Using 0.0.0.0/0 would allow WireGuard to route everything thought the VPNEndpoint Sets the address of the serverSame as before, after that, it's just a matter of enabling the interface and starting the service with the help of wg-quick:
root@vps-f2ab7591:~# systemctl enable wg-quick@wg0.service
root@vps-f2ab7591:~# systemctl restart wg-quick@wg0.service
Then we can run the wg command to see if everything was successfully setup:
root@vps-f2ab7591:~# wg show wg0
interface: wg0
  public key: 7vWlRieSG02iZ60XU8fRsr/jaLKFZdlX1APA0lpBWTA=
  private key: (hidden)
  listening port: 56789

peer: gjElwjk3JrkD/ygAdU9kDorNlAB0ipzMLerqzoyPeGw=
  endpoint: my-server.tld:56789
  allowed ips: 192.168.99.0/24
This output threw me off a bit because I usually see a bit more infos, thankfully after a quick test, I could verify that the tunnel was working
root@vps-f2ab7591:~# ping 192.168.99.1
PING 192.168.99.1 (192.168.99.1) 56(84) bytes of data.
64 bytes from 192.168.99.1: icmp_seq=1 ttl=64 time=30.2 ms
root@vps-main:~# ping 192.168.99.2
PING 192.168.99.2 (192.168.99.2) 56(84) bytes of data.
64 bytes from 192.168.99.2: icmp_seq=1 ttl=64 time=30.1 ms
And after that data have flown a bit, I saw the information I was accustomed to:
root@vps-f2ab7591:~# wg show wg0
interface: wg0
  public key: 7vWlRieSG02iZ60XU8fRsr/jaLKFZdlX1APA0lpBWTA=
  private key: (hidden)
  listening port: 56789

peer: gjElwjk3JrkD/ygAdU9kDorNlAB0ipzMLerqzoyPeGw=
  endpoint: my-server.tld:56789
  allowed ips: 192.168.99.0/24
  latest handshake: 26 seconds ago
  transfer: 604 B received, 692 B sent
Meaning, everything worked perfectly !!
To test things I bit further, I did a quick iperf3 test:
root@vps-f2ab7591:~# iperf3 -c 192.168.99.1
Connecting to host 192.168.99.1, port 5201
[  5] local 192.168.99.2 port 40414 connected to 192.168.99.1 port 5201
[ ID] Interval           Transfer     Bitrate         Retr  Cwnd
[  5]   0.00-1.00   sec  12.4 MBytes   104 Mbits/sec   31    645 KBytes
[  5]   1.00-2.00   sec  11.8 MBytes  98.8 Mbits/sec    0    729 KBytes
[  5]   2.00-3.00   sec  10.8 MBytes  90.5 Mbits/sec    0    792 KBytes
[  5]   3.00-4.00   sec  11.8 MBytes  98.8 Mbits/sec    0    838 KBytes
[  5]   4.00-5.00   sec  11.0 MBytes  92.6 Mbits/sec    3    632 KBytes
[  5]   5.00-6.00   sec  10.8 MBytes  90.5 Mbits/sec    0    708 KBytes
[  5]   6.00-7.00   sec  11.8 MBytes  98.8 Mbits/sec    0    765 KBytes
[  5]   7.00-8.00   sec  10.8 MBytes  90.5 Mbits/sec    0    806 KBytes
[  5]   8.00-9.00   sec  10.8 MBytes  90.5 Mbits/sec    0    831 KBytes
[  5]   9.00-10.00  sec  11.8 MBytes  98.8 Mbits/sec    0    846 KBytes
- - - - - - - - - - - - - - - - - - - - - - - - -
[ ID] Interval           Transfer     Bitrate         Retr
[  5]   0.00-10.00  sec   114 MBytes  95.4 Mbits/sec   34             sender
[  5]   0.00-10.00  sec   112 MBytes  93.9 Mbits/sec                  receiver
Which also work perfectly (NOTE: My VPS only has a 1Gbit connection, this is not the result of WireGuard)
All in all, it took me 45 min to set up and test the VPN while writing this article, I could probably do it in 15 min which wouldn't be the case for any other tech, particularly OpenVPN
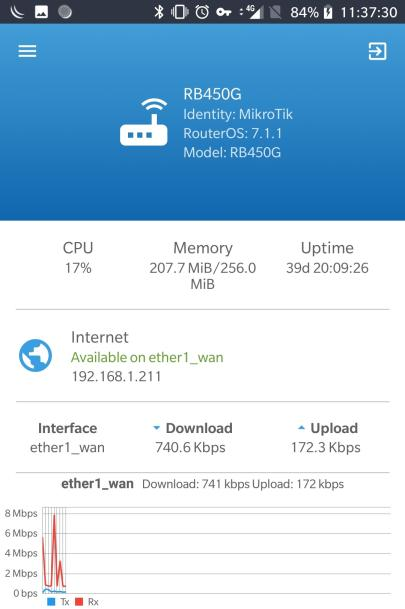
As I'm currently building my homelab, after a lot of consideration, I went with MikroTik, partly because they don't cost a limb, partly because their latest version supports WireGuard I'll have more details of my homelab in an upcoming post but for now my core router is a RB450Gx4 which is not the final router and have some severe limitation, but I got it for 20eur so who cares for testing things out.
MikroTik stupid Winbox UI doesn't auto generate WireGuard keys so, as before, we need to generate a keypair on our machine:
1$ wg genkey | tee /dev/stderr | wg pubkey
20IIT9e0zO338ljbWiMONZbxfmVLiHnJs3ZlxzsrxZ0A=
3u8+M7kLlXJkPvcRsPx7+8rfgUOPV6G9Xu7hubuklpA8=
Setting up the interface is super easy, just click the + button, paste the private key and click Ok:
Next we need to add a peer, to do that, I went to the Peers tab, clicked the + button, pasted the client public key, set his IP address and clicked OK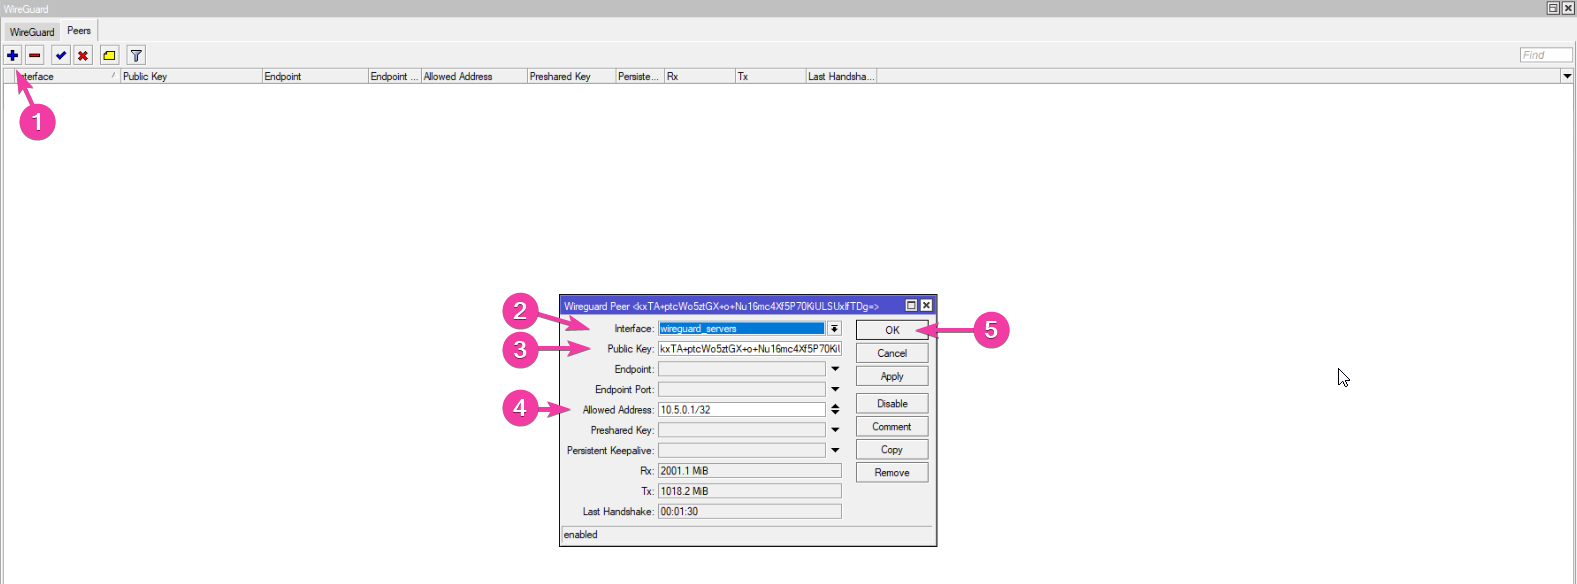
To test things, I added the configuration to the WireGuard client on my phone: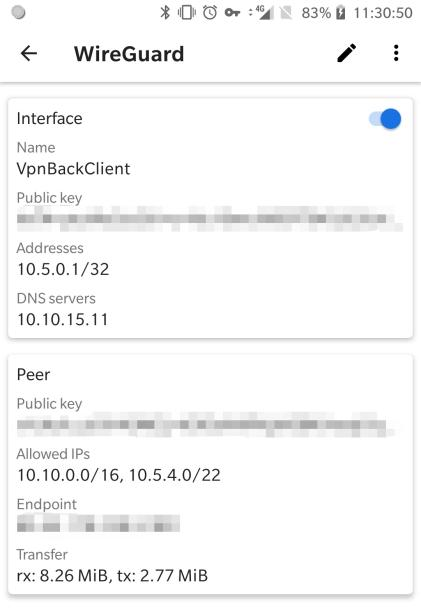
WireGuard is in my opinion better than most VPNs, it offers excellent security while still having blazing fast speeds. It's so lightweight that it can be run on IoT devices, while powerful enough to link server together at their max speed (at least for me).
It's also very easy to configure, which is more than I can say for OpenVPN or IPsec/IKEv2, for example.
I'm very pleased with this, and I can say that unless I need the VPN to run over ssl, it will be a really easy choice to make.
Want to chat about this article? Just post a message down here. Chat is powered by giscus and all discussions can be found here: TheStaticTurtle/blog-comments