Installing an SSO solution in my homelab with Authelia to facilitate the user management and reduce the number of logins required.
First, what is single-sign-on:
Single sign-on (SSO) is an authentication scheme that allows a user to login with a single ID to any of several related, yet independent, software systems.
True single sign-on allows the user to log in once and access services without re-entering authentication factors. It should not be confused with same-sign on (Directory Server Authentication), it refers to systems requiring authentication for each application but using the same credentials from a directory server
In my homelab, I don't really care if I need to reenter my login/password to sign in to an app. So, what I'm actually using is Same-Sign On, however, in this article I'll only show examples of Single-Sign On in this post.
There are multiple options, which all have advantages/disadvantages. Here is a list of the one I investigated and my up/downs of each:
I tested a lot of them, so I probably forgot to mention one, don't hesitate to comment!
I choose to use the full docker-compose method with some modifications to suit my setup. The original example uses traefik because it assumes the same network this is fine, but I'm using multiple hosts for apps, so it had to go. Here is what my docker-compose.yml looks like:
 1version: '3.1'
 2services:
 3  server:
 4    image: caddy
 5    ports:
 6      - '80:80'
 7      - '443:443'
 8    volumes:
 9      - './Caddyfile:/etc/caddy/Caddyfile'
10      - './root_ca.pem:/etc/caddy/root_ca.pem'
11      - './certs:/certs'
12    restart: unless-stopped
13
14  authelia:
15     image: authelia/authelia
16     container_name: authelia
17     ports:
18        - 9091:9091/tcp
19     volumes:
20        - ./authelia:/config
21     restart: unless-stopped
22
23  redis:
24    image: redis:alpine
25    container_name: redis
26    volumes:
27     - ./redis:/data
28    expose:
29      - 6379
30    restart: unless-stopped
The Caddyfile is pretty simple, just a simple reverse proxy that registers the domain to my acme server:
1auth.internal.tugler.fr {
2        tls {
3                ca https://cert.internal.tugler.fr/acme/acme/directory
4                ca_root /etc/caddy/root_ca.pem
5        }
6        reverse_proxy authelia:9091
7}
The Authelia config is pretty long but easy to do compared to some other tools I tried.
The first thing to configure is some internal settings to Authelia, like default variables
1theme: light
2
3jwt_secret: -----censored-----
4default_redirection_url: https://internal.tugler.fr/
5default_2fa_method: ""
Next is the server, the docker-compose.yml exposes port 9091, so it's the one to be used, I'm using the subdomain auth.internal.tugler.fr so I don't need to change the root path. I also didn't set up ssl directly in there because I have it in the reverse proxy with the acme. The rest is default.
 1server:
 2  host: 0.0.0.0
 3  port: 9091
 4
 5  path: ""
 6  # asset_path: /config/assets/
 7
 8  read_buffer_size: 4096
 9  write_buffer_size: 4096
10
11  enable_pprof: false
12  enable_expvars: false
13
14  disable_healthcheck: false
15
16  tls:
17    key: ""
18    certificate: ""
19    client_certificates: []
20
21  headers:
22    csp_template: ""
I don't need to save the logs (docker takes care of it anyway usually) so, debug level and that's it.
1log:
2  level: debug
3  # format: json
4  # file_path: /config/authelia.log
5  # keep_stdout: false
Next is double authentication, I've enabled TOTP and WebAuthn just in case, but I don't actually intend to use it on most apps, maybe on core services like proxmox, but it's not determined yet
 1totp:
 2  disable: false
 3  issuer: tugler.fr
 4  algorithm: sha1
 5  digits: 6
 6  period: 30
 7  skew: 1
 8  secret_size: 32
 9
10webauthn:
11  disable: false
12  timeout: 60s
13  display_name: Tugler
14  attestation_conveyance_preference: indirect
15  user_verification: preferred
16
17duo_api:
18  disable: true
19  hostname: api-123456789.example.com
20  integration_key: ABCDEF
21  secret_key: 1234567890abcdefghifjkl
22  enable_self_enrollment: false
Needs the time to be accurate, apparently 🤷♂️
1ntp:
2  address: "time.cloudflare.com:123"
3  version: 4
4  max_desync: 3s
5  disable_startup_check: false
6  disable_failure: false
Next, I need to set up the actual backend, to check users I have a Windows server running just for that (it's about the only thing that works well). The config was pretty simple, there is a pretty good example in the docs to get started. Even if my ldap_bind user has the permissions to modify password, I didn't actually enable it for now.
The password policy also doesn't need to be enabled.
 1authentication_backend:
 2  disable_reset_password: true
 3
 4  password_reset:
 5    custom_url: ""
 6
 7  refresh_interval: 5m
 8
 9  ldap:
10    implementation: activedirectory
11    url: ldap://ad1.internal.tugler.fr
12    timeout: 5s
13    start_tls: false
14    tls:
15      skip_verify: false
16      minimum_version: TLS1.2
17
18    base_dn: dc=tugler,dc=fr
19    username_attribute: sAMAccountName
20    additional_users_dn: ou=People
21    users_filter: (&({username_attribute}={input})(objectCategory=person)(objectClass=user))
22
23    additional_groups_dn: ou=Groups
24    groups_filter: (&(member={dn})(objectClass=group))
25    group_name_attribute: cn
26
27    mail_attribute: mail
28    # display_name_attribute: displayName
29    permit_referrals: false
30
31    user: cn=ldap_bind,cn=Users,dc=tugler,dc=fr
32    password: -----censored-----
33
34password_policy:
35  standard:
36    enabled: false
37    min_length: 8
38    max_length: 0
39    require_uppercase: true
40    require_lowercase: true
41    require_number: true
42    require_special: true
43  zxcvbn:
44    enabled: false
45    min_score: 3
Next is the access control part, the default is to deny everything, I allow my internal network at 10.10.0.0/16 and the network of my internal VPN at 10.5.0.0/16.
I also added set my app dashboard (internal.tugler.fr) to bypass any auth and only allow users with the group Apps_Paperless_Admin to access paperless.internal.tugler.fr (explained later).
I then proceeded by configuring the Redis cache for the session store and the anti-brute force settings.
 1access_control:
 2  default_policy: deny
 3
 4  networks:
 5    - name: internal
 6      networks:
 7        - 10.10.0.0/16
 8    - name: VPN
 9      networks: 10.5.0.0/16
10
11  rules:
12    - domain: 'internal.tugler.fr'
13      policy: bypass
14
15    - domain: 'paperless.internal.tugler.fr'
16      policy: one_factor
17      subject:
18        - ['group:Apps_Paperless_Admin']
19
20session:
21  name: authelia_session
22  domain: internal.tugler.fr
23  same_site: lax
24  secret: -----censored-----
25
26  expiration: 4h
27  inactivity: 45m
28  remember_me_duration: 1M
29
30  redis:
31    host: redis
32    port: 6379
33
34regulation:
35  max_retries: 3
36  find_time: 2m
37  ban_time: 5m
Then, I added the credentials for my PostgreSQL database
1storage:
2  encryption_key: -----censored-----
3  postgres:
4    host: db.internal.tugler.fr
5    port: 5432
6    database: authelia
7    username: authelia
8    password: -----censored-----
9    timeout: 5s
Notifications are something I didn't configure, I'll probably add email notifications in the future, but I don't have a mail server setup right now, so file system notification it is, just to make the thing happy.
1notifier:
2  disable_startup_check: false
3  filesystem:
4    filename: /config/notification.txt
The final thing to configure is the OpenID connect provider, for which I basically used the default config. The clients array will be configured on the next part.
 1identity_providers:
 2  oidc:
 3    hmac_secret: -----censored-----
 4    issuer_private_key: |
 5        -----BEGIN RSA PRIVATE KEY-----
 6              -----censored-----
 7        -----END RSA PRIVATE KEY-----
 8
 9    access_token_lifespan: 4h
10    authorize_code_lifespan: 5m
11    id_token_lifespan: 4h
12    refresh_token_lifespan: 2h
13
14    cors:
15      endpoints:
16         - authorization
17         - token
18         - revocation
19         - introspection
20         - userinfo
21
22      allowed_origins_from_client_redirect_uris: true
23
24    clients: []
And that's it.
The PBS is pretty easy to configure because it supports OpenID Connect, the only thing to set is the ID, the secret, the redirect URI and the scopes.
 1      - id: pbs
 2        description: ProxmoxBackup
 3        secret: -----censored-----
 4        public: false
 5        authorization_policy: one_factor
 6        scopes:
 7          - openid
 8          - groups
 9          - email
10          - profile
11
12        redirect_uris:
13          - https://10.10.15.23:8007
14        userinfo_signing_algorithm: RS256
Server side it's the url of Authelia, the ID, secret and scope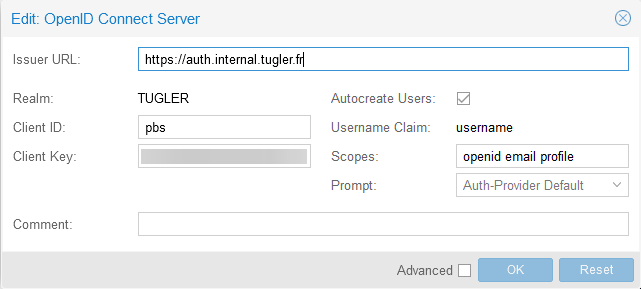
Here is a demo: https://youtu.be/EpZrtVe7h_M
Paperless is a bit different since it doesn't support traditional auth methods like OIDC, LDAP, SAML, …. Instead, it supports header auth (See: https://github.com/paperless-ngx/paperless-ngx/pull/100#issuecomment-1045277482).
Basically, you need a reverse proxy that will do the authentication and send user information as a header to the source. Here is my config for caddy:
 1paperless.internal.tugler.fr {
 2        tls {
 3                ca https://cert.internal.tugler.fr/acme/acme/directory
 4                ca_root /etc/caddy/root_ca.pem
 5        }
 6        forward_auth http://auth.internal.tugler.fr:9091 {
 7                uri /api/verify?rd=https://auth.internal.tugler.fr
 8                copy_headers Remote-User Remote-Groups Remote-Name Remote-Email
 9        }
10        redir /404     /dashboard
11        reverse_proxy paperless:8000
12}
13direct.paperless.internal.tugler.fr {
14        tls {
15                ca https://cert.internal.tugler.fr/acme/acme/directory
16                ca_root /etc/caddy/root_ca.pem
17        }
18        reverse_proxy paperless:8000
19}
My case is a bit special because I use the api of paperless for automatically ingesting PDFs from my emails and can't automate the login flow.
Hence, why I have two hosts, one is direct.paperless.internal.tugler.fr which proxies paperless directly (And use the standard paperless auth which have one user specifically for this), and the other is paperless.internal.tugler.fr which goes through Authelia first.
Caddy is configured to send these headers to paperless:
I also needed to configure environment variables for the docker container. Here is a very reduced example:
1  paperless:
2    image: ghcr.io/paperless-ngx/paperless-ngx:latest
3    restart: unless-stopped
4    environment:
5      PAPERLESS_ENABLE_HTTP_REMOTE_USER: 1
6      PAPERLESS_LOGOUT_REDIRECT_URL: https://auth.internal.tugler.fr/logout?rq=https://paperless.internal.tugler.fr
Demo video: https://youtu.be/9sVzXl-Ttlk
Seems that there are some discussions in the Paperless-NGX repo about multi-user, permission and SSO support:
Overall, I'm very pleased with this setup. It will simplify the login process for all the apps and eliminate the need for multiple user database (for those which don't support LDAP) 😀.
Moreover, it's f-ing cool to have a proper setup in a homelab 😎. Self-Host all the things!
Want to chat about this article? Just post a message down here. Chat is powered by giscus and all discussions can be found here: TheStaticTurtle/blog-comments